Posts

Showing posts from 2021

Flutter - selectable text color

  return MaterialApp ( theme: ThemeData . dark ().copyWith(     textSelectionColor: [Color] ,  

Flutter - TextField border color

  Change by: focusedBorder: UnderlineInputBorder (borderSide: BorderSide (color: keyColor)) , ) , return TextField ( autofocus: true, controller: control , decoration: InputDecoration ( hintText: txt , hintStyle: TextStyle (color: keyColor.withOpacity( 0.5 )) , focusedBorder: UnderlineInputBorder (borderSide: BorderSide (color: keyColor)) , ) , onChanged: func , ) ; } } //you can alse change the focusColor:
Flutter - rescue packages , install packages manually

 if you delete packages "accidently",and you want it in the future. then you find out why .yaml doesn't work... haha  download the package version. for ex:  https://pub.dev/packages/admob_flutter/versions   put inside below location: (show hided files by press :  command + shift + .   )   Users>[your username]>Developor>flutter>.pub-cache>hosted>pub.dartlang.org

Dart syntax- Isolates,typedefs,metadata,@

Image
   ☝ called  讓實體能像方法一樣 ☝ Isolates  dart能讓每個isolates有自己的記憶體和單線,解決多項事件同時共享記憶體時容易發生錯誤的問題。 ☝ typedefs  很像填表單一樣,有個單表名稱,內容就是自定義一個制式的程式格式。初始即對應填表單。 ☝metadata @程式注記。可自定義。建立dart ,後導入 import xxx.dart ,@xxx。

Dart syntax - initSate,Build,deactive, Dispose

   ☝ initSate(){ super.initSate   //放置一旦載入statefulwidget後就不需一直更新的物件。 } 如字面的意思in it sate. 此功能好比statefulwidget 裡面的statelesswidget。    Called only once  when the widget is created,只會執行一次,不像build() 一變動就自毀後重建。 ☝Build(BuildContext context) { //放置載入後每次有任何變動就需更新的物件。 }          - Build the widget tree         -A build is triggred every time we use   setState() that re-triggre build(). ☝ deactive() {super.deactive  // 放置當statefulwight自毀換頁前跟著毀的物件。例如:釋放記憶空間。 } ☝Dispose()          - When the widget/state object is removed.

Dart syntax - if else for, forEach,throw, try catch,try on

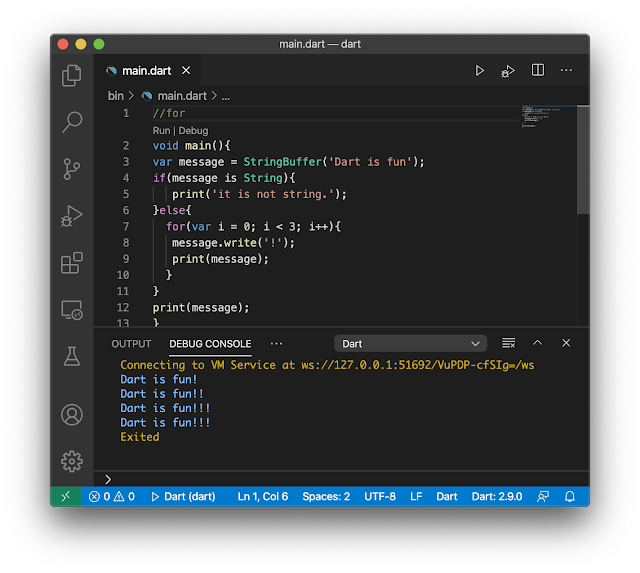
Image
   ☝if  else 可多條件 ☝for 單條件 ☝for ☝forEach ☝forEach = for-in 一一叫出來 👉自訂例外(exception / error)處理 throw & try catch & try on ☝try catch  無指定型別 ☝try on  type  指定型別 ☝try catch  final  final是用於確認某特定的code是否有例外丟出。 ☝try{...}catch(e){...  rethrow };  可看到系統定義的例外訊息。

Flutter install

Image
 20200806 下載flutter SDK 解壓後 ,我是將移至/usr/local 1.配置$PATH, 更新/etc/paths: cd /etc sudo nano paths 2.輸入存放flutter的bin的位置: /usr/local/flutter/bin control+ O (儲存)  control+x (離開) 4. 確認flutter指令可運作:which flutter  5.到App Store安裝Xcode這邊就不教了,可透過指令配置到最新版本: sudo xcode-select --switch /Applications/Xcode.app/Contents/Developer sudo xcodebuild -runFirstLaunch 6.xcode license簽個同意書就完成了: sudo xcodebuild -license agree (7.可不裝…)

Dart - setup in VScode

Image
20200809  1. 下載Dart SDK 後解壓 2. 我還是放跟flutter一樣 /usr/local的位置,建置環境變數$PATH 完成! 可以Hello world測試一下 測試結果

Flutter - http parameters

20210609 stackoverview   "http ? coverted to 3%F in url" var queryParameters = { 'q' : cityName, 'appid' : 'b6907d289e10d714a6e88b30761fae22' , }; var uri = Uri .http( 'samples.openweathermap.org' , '/data/2.5/forecast' , queryParameters);

Flutter - "The iOS Simulator deployment target 'IPHONEOS_DEPLOYMENT_TARGET' is set to 8.0"

Image
 2021-05-31 stackoverflow step1 step2 step3 post_install do |installer| installer.pods_project.targets.each do |target| flutter_additional_ios_build_settings(target) target.build_configurations.each do |config| config.build_settings[ 'IPHONEOS_DEPLOYMENT_TARGET' ] = '9.0' end end end or post_install do |installer| installer.pods_project.targets.each do |target| target.build_configurations.each do |config| config.build_settings.delete 'IPHONEOS_DEPLOYMENT_TARGET' end end end step4 其實新版的沒這問題…